- All Standard Operating Procedures
- UOL – Liquid Diffusion Coefficient Apparatus SOP
Standard Operating Procedure
Introduction
The Armfield ‘Diffusion of a liquid apparatus’ is a specialized device that enables students to accurately measure fluid diffusivity, a key parameter in fluid flow and mass transfer operations. Understanding fluid diffusivity is essential in various applications, as it plays a crucial role in processes like gas exchange and the design of industrial plants. By providing valuable data on diffusion rates, this apparatus allows for a deeper understanding of mass transfer processes, which are critical for optimizing plant design and ensuring efficient fluid handling in engineering systems.
Do not proceed with testing without following all safety procedures. A basic list of safety considerations is provided in Section II of this SOP.
Safety
- All students must wear safety glasses when working in the lab.
- Never leave this equipment operating unattended.
- Mix all chemicals in a fume hood.
- All chemicals, solutions, and standards must be stored in a sealed container. The container must be labeled with chemical(s) name and concentrations, operator/user’s name, hazards, and date of storage. Confirm storage location with the lab manager.
- All chemical Containers must be sealed when not in use.
- All unwanted material must be placed in an appropriate container. The container must be labeled “Unwanted Material.” The label must include the chemical(s) name and concentration, the operator/user’s name and contact information. See the sign posted above the unwanted materials table in the Senior Lab.
- Only pure water can go down he drains.
Equipment Description
The liquid diffusion apparatus consists of the following components.
- 1 Liter diffusion vessel.
- Diffusion cell manufactured from glass in the shape of a hook. The lower end of the Glass hook is enlarged and incorporates a PVC disk that is perforated with a honeycomb of parallel capillaries.
| Length of capillaries | 4.5 mm |
| Diameter of capillaries | 1 mm |
| Number of capillaries | 121 |
- Conductivity meter with working range from 0-20 mS.
- Magnetic stirrer.

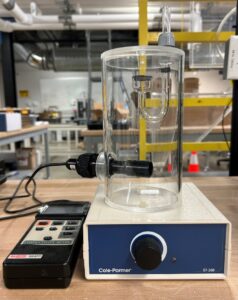
Figure 1. Liquid diffusion apparatus with conductivity meter and magnetic stirrer.
Procedures
- Wash the glass diffusion cell and the diffusion vessel with warm soapy water then rinse with DI water to remove any grease or contamination.
- Fill the diffusion vessel with 1 L of DI water.
- Place the diffusion cell and lid on top of the diffusion vessel and verify that the top of the capillaries of the diffusion cell are 5 mm below the surface of the water.
- Remove the lid/diffusion cell and dry the cell to remove any excess water. Check that the black collar on the vertical shaft is located 5 mm above the top of the capillaries of the diffusion cell.
Note: The black collar on the diffusion cell should now be in line with the top of the water when placed back on the diffusion vessel.
- Place the stirrer bar into the bottom of the diffusion vessel and place the vessel on top of the magnetic stirrer.
- Connect the conductivity electrode to the socket at the top of the conductivity meter.
- Set the range switch to 199.9 µS on the conductivity meter and switch the meter on by pressing the POWER button.
- Press REC button to leave the meter permanently powered.
- Fill the glass diffusion cell with desired salt solution following the methods below:
- Immerse the hook into the solution while forcing liquid through the capillaries using a syringe filled with the same solution.
Note: This step can be done with the hook still in the lid by putting the syringe needle through the hole in the middle of the lid.
-
- Repeat this step till there are no more air bubbles trapped inside of the hook and capillaries.
- Remove the hook from the solution and wipe off any excess solution from the outside of the cell and the tops of the capillaries using filter paper or similar absorbent material, but take care not to suck the salt solution through the capillaries.
- Using the syringe fill or remove solution from the vertical part of the hook until the liquid level is in line with the black collar i.e. 5 mm above the tops of the capillaries.
- Switch on the magnetic stirrer and adjust the speed control until the contents of the diffusion vessel is gently agitated without excessive motion at the surface.
Note: The speed must be sufficient to five god mixing within the vessel but not allow disturbance such as a vortex to form.
- Carefully install the lid/diffusion cell on top of the vessel ensuring that it is located squarely into the recess. Take are not to tilt the cell as it is immersed in the water to prevent loss of the salt solution.
- Start a stopwatch and record the conductivity reading at 200 second intervals. The experiment should continue for at least 2000 seconds.
Shutdown
- Turn off the magnetic stirrer, the conductivity meter, and unplug the conductivity electrode from the conductivity meter.
- Empty all of the liquid from the diffusion vessel and cell.
- Wash the glass diffusion cell and the diffusion vessel with warm soapy water then rinse with DI water to remove any grease or contamination. Dry both the diffusion vessel and cell.